Introduction
After two weeks of study, I finally finished studying the front-end (HTML5, JavaScript) part of the web and the back-end (PHP, MySQL) part. Through this period of study, I can already independently create a login and registration page and submit its content to the MySQL database. Below, I will introduce in detail the whole process of how I built the login and registration pages.
N.B. The domain name www.terry906.top in the watermark of screenshots formly belonged to me, so these screenshots were not copied from others!
Text
Preparation
For rookies, I do not recommend renting or purchasing a virtual host (VPS) to practice building a website, because the building environment is complicated and difficult for rookies to understand. We can download an out-of-the-box software called PHPstudy on the computer to build a local website, deploy the WAMP (Windows+Apache+MySQL+PHP) environment within one click, and use virtual domain names to simulate the website environment.
First, we go to the PHPstudy official website to download the small skin panel. After the download is complete, click the "Start" button next to WAMP to install the relevant environment. After the installation is complete, click "Website" (网站 in Chinese) on the left sidebar.
Then fill in the URL starting with www in "Domain Name" (域名 in Chinese). Here we take www.test.com as an example. After filling in the URL, tick "Create Database" (创建数据库 in Chinese) and set the account (用户名 in Chinese) and password (密码 in Chinese).
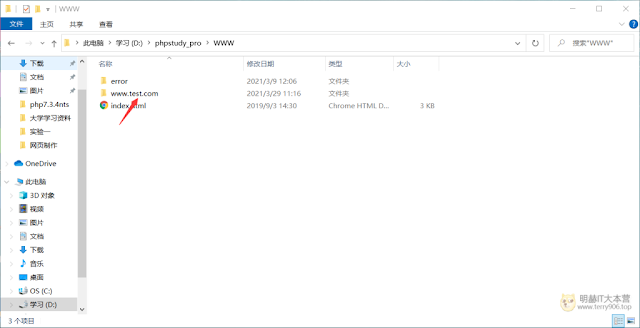
After all these are done, go to the "phpstudy_pro" folder on your computer, find the folder named with the customized domain name under the "WWW" subfolder, and copy the created web page folder into it. I will talk about the login and registration process in detail later.
Go to "Software Management" (软件管理 in Chinese) to download and install the database management tool sqlfront. It is recommended for rookies to use this because it is a graphical interface. Of course, you can also choose to use Navicat, but the genuine version requires subscription, which is not cheap in Chinese Yuan.
Once logged in, click "Create" (新建 in Chinese) to create a login.
Fill in the default local IP address 127.0.0.1 in the "host" column, and then select the database you just created below.
After opening, double-click the database you just created, move the cursor to it and right-click "Create" (新建 in Chinese) - "Table" (表格 in Chinese), the following window will pop up.
Follow the example above and create corresponding fields to store data.
At this point, the preparation of the database is completed. Next, I will detail the process of writing the source code for the login and registration pages in the next post.
SQLfront error message
During the process of creating a MySQL database, I encountered some unexpected situations. For example, error number 1055 in the picture below.
Conclusion
Thank you all for your patience in reading. If you have any questions, please leave it at the comment area below.


Comments
Post a Comment