Configuring DNSPod DDNS on Synology NAS to achieve external network access

 Introduction

This article will explain in detail how to use the in-built DDNS function in Synology DSM to implement Tencent Cloud DNSPod dynamic domain name resolution. Here I will take the domain name purchased on Alibaba Cloud as an example.

Text

Transfer your nameservers to DNSPod

Log in to the Alibaba Cloud console, search for "Domain Name Console" in the search box, click on your domain name and modify the DNS (mine has been modified before) to:
f1g1ns1.dnspod.net
f1g1ns2.dnspod.net


Add domain name resolution

Register dnspod and log in (you can also log in directly with a Tencent Cloud account), DNSPod official website: https://www.dnspod.cn/. Click on your domain name, add an A record, and set the A record to resolve your domain name to any IP (e.g. 0.0.0.0).

Then go to "Key Management" and click "Create Key", copy and save the generated ID and token. Please note that token information is only displayed once when created, so copy and save it in time!

Configure DDNS on Synology DSM

Click "External Access" in "Control Panel" and select "New" in "DDNS".


For the service provider, select DNSPod.cn, enter the domain name (starting with www), fill in the ID just created for the user name, fill in the token just created for the password, and then click OK.


After the resolution is successful, the status will turn to "Normal". Restart the router or PPPoE redial to change the public IP address. Synology detected the new IP address and notified the service provider to change the domain name pointing, successfully maintaining resolution.

Configure port forwarding on your router

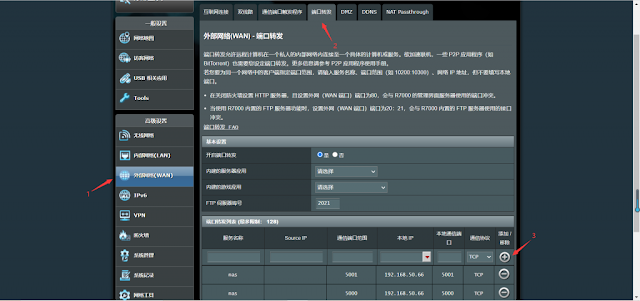
Here we take the Merlin firmware router as an example. Add Synology's HTTP and HTTPS ports to Synology's intranet IP, select the TCP protocol, fill in the information as shown below, click the plus sign at the end, and then click "Apply to save settings" at the bottom.


N.B. Some models of routers need to be restarted after saving to take effect. If the default port of DSM has been modified, the port number needs to be changed to the modified port number.

Now the configuration is complete, and you can now use your domain name to access Synology NAS from the Internet! However, with just this setting, you cannot access the NAS using a domain name from within the intranet. For intranet access methods, please refer to my previous blog.

Conclusion

Thank you all for your patience in reading. If you have any questions, please leave it at the comment area below.


Comments

Popular posts from this blog

Ways to bypass GFW as a foreigner in Mainland China

I'm surprised to find out there are very few tutorials for westerners living in Mainland China to bypass the Great Firewall built by CCP. Maybe you come to Mainland China due to multiple reasons, such as academic communication,work or live here. However, popular VPN providers like ExpressVPN,NordVPN and surfshark can't work very well here. The VPN traffic and socks5 proxy traffic has already been precisely detected and blocked by GFW for ages. Now, I will introduce some new techniques for you to bypass GFW: Consider using proxy servers running advanced proxy protocols such as Vmess,ShadowSocks and Trojan rather than VPN servers. These protocols are based on socks5 protocol which locates at the application layer of OSI model, and their performance are much greater than VPN protocols. You can buy those services from proxy providers("机场" in Chinese). They provide servers("节点" in Chinese) in multiple locations, even all over the world. Quality of service and loc

Welcome to my blog!

This is the English version of my tech blog. However, as a student, I'm busy with my study and don't have enough time to translate my blogs into English. Sorry for the inconvenience! The link of my Chinese version tech blog is:  https://hackerterry.netlify.app

Enabling Intranet access to Synology DSM through domain name for Merlin firmware routers

Introduction I recently bought a Synology NAS, a DS218play machine that has been discontinued (due to lack of money), and started a long process of tinkering with it. Because I have been living on campus for a long time, I wanted to access the Synology NAS at home through the domain name to implement various functions, such as mapping disks on the external network.  However, due to the NAT loopback restriction set by the network providers in China, I later found that I cannot access the Synology NAS using the domain name in the Intranet of my home. After a long period of exploration, I finally succeeded! Here I will share with you the specific method, which can be achieved without putty or secureCRT. Text First download the WinSCP software online, as shown in the figure after downloading and installing. Select the SCP protocol. The host name is the IP of your router's management page. The username and password are the same as those used to log in to the routing management page. Jus